Cooking from the Hearth
This group of articles appeared in the G section of “The Boston Globe on January 13, 2013. They are all about cooking with fire. It was a lot of fun to write and research.
Wood-burning ovens take on new life in restaurants
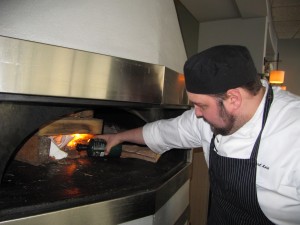
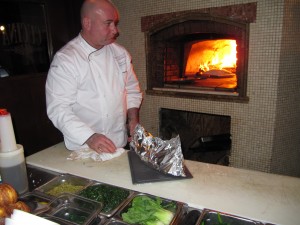
Despite freezing temperatures outside, the door to the contemporary Brookline restaurant Lineage is wide open. Chef de cuisine Richard Morin is getting ready to build the daily fire in a large freestanding wood-burning oven. “Fire is a living thing, it needs food and air,” he says. Morin builds his base with two pieces of hardwood (usually oak) parallel to each other and another across the top. He loosely crumples copies of last night’s menu and sets a few beneath the logs, along with kindling. He aims a butane torch and a flame licks the paper. The fire is slow at first but then the dry logs combust and a blast of heat comes from the mouth of the oven.
“You can’t be in a rush when you cook with fire,” says Morin. It will be two hours and more than a dozen logs later before glowing wood embers get the oven to the right temperature. “Historically, this is why a cast-iron kettle was set in front of a fireplace to cook all day.”
The chef of Bricco Ristorante and Enoteca in the North End is also cooking with fire, as is Michael Leviton of Area Four in Cambridge, and others around the city and the country. A fire has been at the center of human social life from the beginning, and an enclosed hearth gives any restaurant a welcoming feeling. But these ovens are not for decor or ambience. They are workhorses, central to the cooking of many, if not most, dishes on the menu. What’s appealing about wood-fueled ovens is the intense, dry heat that sears food, creating a crusty exterior and a moist interior. In a cast-iron skillet, Morin sears slices of foie gras with matsutake mushrooms and bacon, he roasts chicken, fires pizza, and braises lamb.
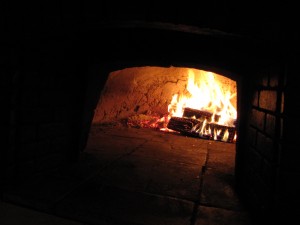
Both Lineage and Area Four have Wood Stone ovens made in Washington state. Both chefs cook in cast iron and use the ambient heat in the oven for braising (about 220 degrees),
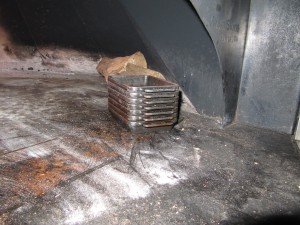
after the fire has died down. These state-of-the-art ovens are regulated by digital thermometers mounted to a wall nearby to keep track of interior temperatures, which hover around 500 degrees.
The Pilgrims built their houses at Plimoth Plantation to make the hearth and its fire central to their lives. It was where the women cooked, the family gathered, and everyone stayed warm. Explains Kathleen Wall, Plimoth’s Colonial Foodways Culinarian, “A house in the 17th century was one 20-foot-by-20-foot room.”
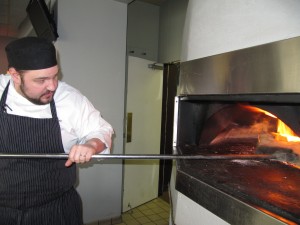
At Lineage, Morin, a Framingham native, uses a long-handled tool to push the blazing fire to the rear of the oven.
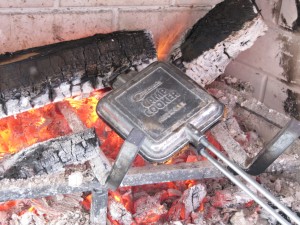
He recalls family campfires and pie irons. “My dad would get a whole loaf of white bread and cans of apple pie filling for us kids. We would put in a piece of bread, the pie filling and another piece of bread, and close the pie iron [and toast it]. I get goose bumps just thinking about it.”
Caruso, who comes from the small village of Capestrano in Abruzzo, puts fresh apples and quince directly into the hot ash without any foil. When the fruit is tender, he peels away the skin. “The ash imparts a very special flavor to the fruit,” he says.
Although home cooks can’t achieve the extreme temperatures of a restaurant’s wood-fired oven, we can do some of the same things in our fireplaces after the logs burn down to embers.
Caruso’s favorite wood-cooked dish is whole fish. He’s making two tonight, both with Mediterranean fish, one a branzino, the other orata. He brushes the branzino with a flour-and-water paste and presses handfuls of large-crystal salt onto the skin.
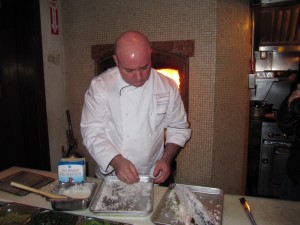
When it emerges from the oven, he breaks open the salt crust with a knife and his hands. “You have to be able to stand the heat,” he says, wincing a little. Under the skin, the sweet flesh is moist and surprisingly, not salty.
He cooks the orata in a packet of foil lined with parchment (this keeps the fish from tasting metallic), stuffs it with vegetables, and surrounds it with artichokes.
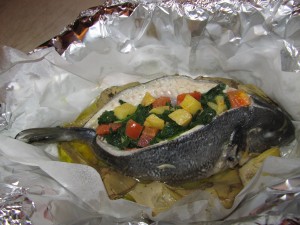
“We add vermouth to the packet before we serve it,” says the chef, “so when the foil is opened at the table, you get a blast of aroma.”
Bricco’s oven is the center of activity in his open kitchen, with staff using a long metal paddle to ease dishes in, reposition others, and give the blazing cavity a sense of musical meals.
Cook in your own fireplace
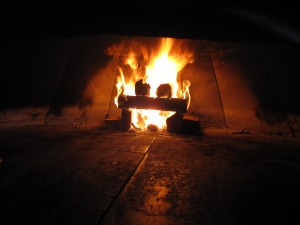
It takes about two hours and eight logs to get a nice bed of embers for cooking. We learned this when a glowing red and white-hot bed remained after another lazy holiday fire was fed log after log. Surely this glorious heat could be used to cook real food — not just chestnuts and s’mores, but a cast-iron skillet of sizzling chicken,
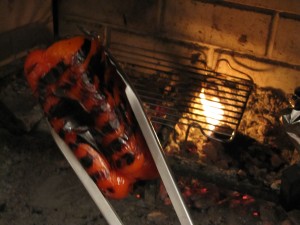
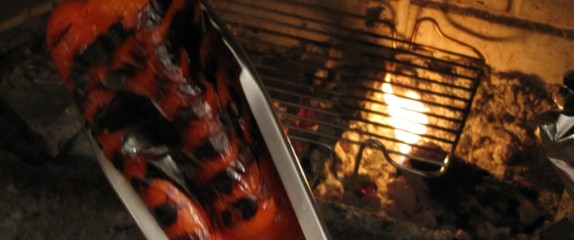
roasted red peppers close to the embers for peeling and turning into a sweet-and-sour Italian salad, a pot of quick baked beans with hot dogs.
And so the fireplace at home became the cooking hearth for certain things. Equipment included a favorite cast- iron skillet found years ago at a flea market,
a couple of old cake racks to set on the log stand, fireplace gloves, and long tongs. The daily experimentation began.
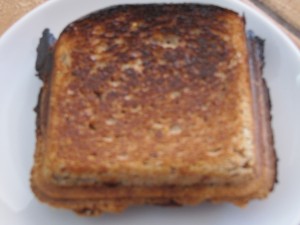
We made grilled cheese sandwiches with Muenster and honey-baked ham in double-handled pie irons (from a camping trip), rotating them above the embers. We unlatched the hook to find perfectly toasted sandwiches.
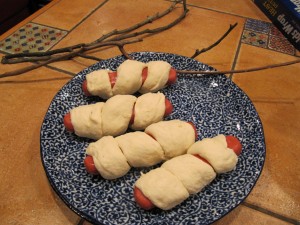
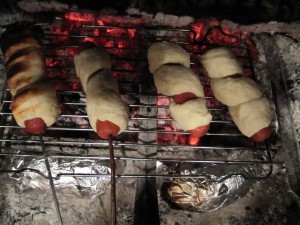
A trip to the library yielded “The Kids Campfire Cookbook,” by Jane Drake and Ann Love. The recipes for hot dogs with a coil of homemade biscuit dough,
for baked apples with cinnamon,
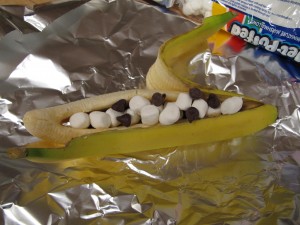
and for bananas, split and stuffed with chocolate chips and marshmallows wrapped in foil, were all delicious.
Looks like we’re not the only ones with an interest.
Fireplace safety tips for cooking
Assistant Fire Chief John T. Fleck of the Lexington Fire Department says cooking in your fireplace is OK and “sounds great.” Before you do, he says, “Make sure the fireplace and chimney are up to code, which means it has been inspected and cleaned.” Fleck also recommends having a fire extinguisher on hand. “I’m old school,” says Fleck. “A cheap option is to fill a coffee can with baking soda and have it nearby.”
Keep children away from the fireplace. Although the flames may be gone, the heat is still intense. When cooking, use fireplace tools to move the coals around, spreading them evenly to create a bed of heat. Use long handled tongs and forks and a pair of heavy fireplace gloves. Stay next to the fireplace while cooking.
Fleck reminds cooks not to close the flue to the chimney until the ashes have completely extinguished. “I know that people are worried about losing heat, but this is very important.” Here are his other suggestions.
10 fireplace tips for cooking
1. Make sure your flue is wide open.
2. Make sure there is a fire-retardant carpet or proper hearth floor in front of the fireplace.
3. Have a good source of ventilation.
4. Check to be certain your smoke and carbon monoxide detectors are in working order.
5. Properly dispose of ashes. Disposal of ashes is done only when they are cooled down and put in a proper container with a lid (fires go out when they are deprived of air). The best way is to let the ashes self-extinguish.
6. Do not wear loose clothing.
7. Use proper tools for cooking: cast-iron (not aluminum), long handled utensils.
8. Have a fire extinguisher nearby.
9. Do not ever use charcoal in the fireplace.
10. Have a small first-aid kit on hand, just in case there are minor burns.D.S.
RECIPES
Quick baked beans on the fire
Serves 4
Make these baked beans with small white canned beans, bacon, and seasonings. The flavor is light, not cloyingly sweet or over-sauced like commercial canned beans, where sugar is often a main ingredient. Instead of the traditional salt pork, use strips of smoky uncured bacon. Set a cast-iron pot on your stove or over a fire’s embers.
| 3 | slices bacon, cut into thirds |
| 1 | small onion, chopped |
| 2 | cans (about 15 ounces each) small white beans, drained and rinsed |
| 1 | can (8 ounces) tomato sauce |
| 1 | tablespoon tomato paste |
| 2 | tablespoons molasses |
| 1 | teaspoon English mustard powder |
| 2 | teaspoons salt |
| ½ | cup water |
1. Heat a deep cast-iron skillet or Dutch oven over medium heat for 1 minute. Add the bacon and cook for 1 minute. Add the onion and cook for 8 minutes, stirring often, or until it softens.
2. Stir in the beans, tomato sauce and paste, molasses, mustard powder, salt, and water until well combined. Bring to a boil.
3. Set a cake rack over the log rack, making sure it is stable. With a fireplace tool, distribute the embers so they form a thin layer. Set the pot on the rack. Cook the beans for 15 minutes or until they are flavorful.
4. Remove the cover and cook, stirring often, 1 minute more. Discard the bacon, taste for seasoning, and add more salt, if you like. Debra Samuels
Hot dogs in biscuit buns
Serves 4
This is an all-in-one hot dog and bun recipe. Make a simple biscuit dough, shape it into several rounds, form ropes, and wrap them around the hot dogs. You can insert a metal skewer into one end of the frank to hold and rotate over the embers or set the pastry-wrapped dogs on a wire rack.
| 1 | cup flour, or more if needed |
| Pinch of salt | |
| 2 | teaspoons baking powder |
| 1 | tablespoon butter |
| ½ | cup milk (low-fat or whole) or water |
| Flour (for shaping) | |
| 4 | hot dogs |
1. In a bowl, whisk the 1 cup flour, salt, and baking powder.
2. With your fingers work the butter into the flour until the butter is in coarse crumbs. Add the milk and stir with a fork until it forms a dough; it will be very sticky.
3. Sprinkle 1 teaspoon of flour onto the top of the dough. Dip your fingers into the flour. Lightly knead the dough and form it into a ball. Divide the dough into 4 pieces and roll each into a ball.
4. Roll 1 ball between your palms to create an 8-inch rope. Starting from the top, wrap the dough around the hot dog in a spiral. Pinch the dough together at the top and bottom to keep the dough from uncoiling during cooking. Repeat with the remaining hot dogs and remaining dough.
5. Set a wire rack on top of the log stand so the rack does not touch the embers. With a fireplace tool, disperse the embers so they are about 2 inches from the bottom of the rack. Set the hot dogs on the rack. Cook, turning every minute for about 6 minutes, until thepastry is puffed and lightly golden. Watch carefully so the pastry does not burn. Adapted from “The Kids Campfire Cookbook”
Chicken thighs with rosemary
Serves 4
| 6 | skinless, boneless chicken thighs |
| Juice of ½ lemon | |
| 1 | tablespoon olive oil |
| 2 | tablespoons chopped fresh rosemary |
| Salt and pepper, to taste | |
| 1 | lemon, cut into wedges (for serving) |
1. In a shallow dish, toss the chicken thighs with lemon juice, olive oil, rosemary, salt, and pepper. With your hands rub the seasonings into the thighs. Cover the chicken and refrigerate for 1 hour.
2. Place a rack over the log stand. Wearing fireplace gloves, set a cast-iron skillet on the rack and let it heat for 1 minute. Transfer the chicken to the skillet. Cook for 3 minutes. With tongs, turn the chicken and cook 3 minutes more. Turn the chicken again and cook 1 minute more on each side or until golden.
3. Remove the skillet from the rack. Serve from the pan with lemon wedges. Debra Samuels
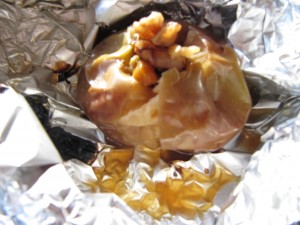
Baked apples on the fire
Serves 4
Apples wrapped in heavy-duty foil and baked over embers make a delicious homey dessert or breakfast treat. Cook the apples plain or add raisins, walnuts, and maple syrup as we do here. Chef Gianni Caruso of Bricco in the North End, says, “I put apples and quince directly into the hot ash and let it cook. The ash imparts a very special flavor.” Without its foil protection, the apple skin hardens and comes off like a shell, leaving creamy warm apple flesh.
| 4 | apples |
| 1 | tablespoon lemon juice |
| 2 | tablespoons raisins |
| 2 | tablespoons walnuts, coarsely chopped |
| 4 | tablespoons maple syrup |
| 1 | teaspoon ground cinnamon |
| 1 | tablespoon butter, cut into 4 pieces |
| Vanilla ice cream (for serving) |
1. Cut off the top quarter of the stem end of the apples. Carefully core and seed the apples. With a spoon, create a larger hole. Sprinkle the cavities with lemon juice. Add raisins, walnuts, maple syrup, cinnamon, and butter.
2. Set 4 squares of foil, shiny side up, on the counter. Place the apples in the center and form packets. Close tightly.
3. Set the packets between the bars of the log rack, not touching the coals, or set them directly in the coals of a dying fire. Check the apples after 15 minutes by inserting the tip of a knife through the foil and piercing the apple. You may need to rotate the apple. If it is soft, the apple is ready. Remove with tongs.
4. Open the packages carefully and cool for about1 minute. Transfer each apple to a bowl, add a spoonful of ice cream, and eat with a spoon. Adapted from “The Kids Campfire Cookbook”
About admin
This author has yet to write their bioRelated posts


Bento:Build a Better Lunch
 Debra Samuels, bestselling author, food writer and cooking instructor,
 wants to give the American lunchbox a makeover. In the chapter on “bento,” the traditional Japanese lunch box, in her upcoming book, My Japanese Table, Debra encourages the use of color, texture and taste to create healthier and more visually appealing meals.
read more »